
|
|
|
|
All sizes can be varied if needed.
(1)
From the corrugated cardboard, cut out
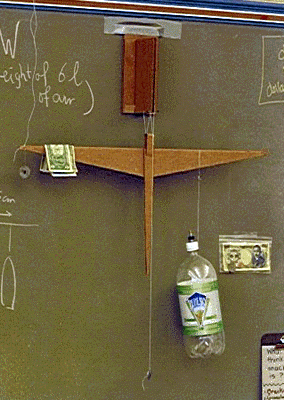
the beam: this is the big horizontal triangle in the picture. Mine is
72 cm tip-to-tip, the center is 8 cm high, and the tips do not quite go
to points, but are 1 cm wide. Cut it such that the waves in the cardboard
are parallel to the long side for maximum strength.
(2)
Cut out the pointer. This is the skinny triangle pointing down from the
middle of the beam. Again keep the grain of the cardboard parallel to the
longest dimension. Length is 33 cm, width at the top 3 cm.
(3)
Glue the pointer to the middle of the beam. Use a T-square or a sheet
of paper to make sure that the middle of the pointer is perpendicular to
to the top edge of the beam.
(4)
Cut a 2x13.5 cm strip, and crease and fold it so that it makes an inverted
U-shape (6+1.5+6 cm), which is glued to the top center of the beam, sticking up about 4 cm.
 (5)
Now we make the support: a 10x23 cm piece will go against the wall.
A 20x24 cm piece is creased and folded (3.5 + 8.5 + 8.5 + 3.5 cm) so it makes a V-shape with 3.5 cm
flanges, which are glued to the wall plate.
(6)
I used duct tape to tape this support onto the blackboard (or door,
doorframe)
(7)
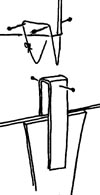
Use 4 pins as shown (need figure here) on the wall mount,
and make a piece of thread
with small loops tied to each end, about 29 cm long. Hook one end over the
right rear pin, make a hanging loop down and up to the left rear pin, from
there to the left front pin, and another hanging loop down and over to the
the right, where you hook the loop at the end of the string onto the right
front
pin. You now have two hanging loops, one in the front and one in the back,
into which we will cradle the beam.
(8)
 Put two pins into the top of the u-shaped piece of the beam, at the same
height, one front-to-back and one back-to-front,
and hang the beam assembly into the two thread loops of the support.
Because the support loops are made from a single piece of thread, you can
pull the beam around a bit until it hangs parallel to the wall and the
pointer points straight down.
(9)
Make a plumb line: a piece of thread with a small loop at one end and a
washer on the other end. Hang it from the pin on the front of the beam.
When things are balanced, the pointer is aligned exactly with the vertical
defined by the plumb line.
(10)
Optionally, you can tie a loose thread to each tip, and tape it to the
top of the blackboard. This prevents the whole thing from wild swings when
the sides are unbalanced. In the photo, one is shown.